
Material and treatment options depend largely on the condition of your crawl space

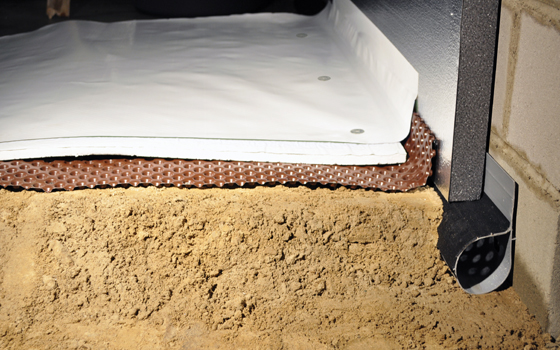
Stronger than dirt. Even a wet, dirt-floored crawl space can be transformed into a clean, dry environment by installing the right materials. This photo shows dimpled drainage matting to promote soil drying & drainage, along with drainage pipe that captures seepage through walls and floor. Rigid foam insulates the walls & floor. A thick plastic air and moisture barrier covers the floor and is sealed to the wall insulation.
If you’ve been reading about crawl spaces at myHOMEscience.com, this blog topic won’t come as a surprise. Among the many questions and comments on crawl space topics, quite a few are about floor issues. So let’s take a closer look. Here goes…
It’s complicated.
Time to ‘fess up: It’s not easy to get the floor details right in a crawl space. This is mainly because your treatment strategies need to successfully deal with moisture, air sealing, insulation, pests and (last but not least) appearance.
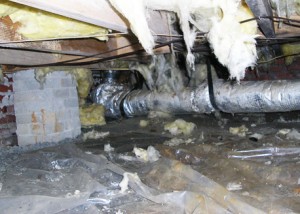
What you do with your crawl space floor really depends on the conditions you’re dealing with. A crawl space with a dirt floor and lots of moisture coming through the soil moves us in the direction of a worst-case scenario. We’ll get there completely if we add pests (insect & rodent), mold and wet fiberglass insulation that droops and falls onto the floor.
Yes, that’s a bad situation. But it’s not insurmountable, thanks to some innovative products and the ongoing research done by the building science community. Let’s start fixing this wet, ugly, smelly crawl space.
I’d begin by clearing & cleaning the crawl space floor and removing the fiberglass insulation. Although dry, intact fiberglass insulation installed between joists can be left in place, my preference is to remove this material. The fiberglass isn’t necessary if we insulate crawl space walls with rigid foam, and dry batts can provide an attractive (and hidden) habitat for pests.
The next step is to install a sump pump in the lowest part of the floor and a perimeter drain system to collect ground water and transport it to the sump pump. I like the SmartPipe® drains that are part of the CleanSpace® system (shown in the photo). This specialized drainage pipe is flanged to fit against the crawl space wall, where it captures wall seepage as well as ground seepage.
After insulating the crawl space walls with rigid foam, I’d cover a wet or damp crawl space floor with a layer of dimpled plastic drainage matting. The air space created by the matting will promote good drainage and evaporation of soil moisture. It also complies with air-extraction requirements, if you need a radon abatement system installed. If your home tests high for radon gas (above the EPA’s recommended “action” level of 4pCi/L), definitely consult with a radon abatement contractor before you undertake the encapsulation process. (Visit http://www.nationalradondefense.com for more info.)
You get what you pay for. A cheap, lightweight poly sheet makes a poor crawl space moisture barrier. Easily torn and punctured, this flimsy film won’t effectively keep moisture out of the crawl space. For best results, use sturdy materials developed specifically for crawl space encapsulation.
Mind the moisture barrier
A durable, properly installed crawl space moisture barrier is one of the most important components in a sealed crawl space. In addition to keeping soil moisture out of the crawl space, it also seals out air, pests, dirt, radon gas, and dust. Even if your crawl space has a concrete floor, it’s smart to cover the concrete with a poly moisture barrier for more complete control over the microclimate in your crawl space.
Don’t install a cheap, flimsy black poly moisture barrier on your crawl space floor. The CleanSpace® moisture barrier developed by Basement Systems is a good example of a top-quality product. Its 20mil thickness and polyester cord reinforcement provide excellent durability and puncture resistance. The white color will brighten even the darkest crawl space, and the manufacturer treats the poly sheet with an anti-microbial agent to discourage mold.
The moisture barrier needs to be carefully installed, with all seams thoroughly sealed with compatible heavy-duty tape. If crawl space walls aren’t being insulated as part of the encapsulation process, the poly needs to extend up the full height of the wall, then be sealed and fastened to the rim joist that rests on top of the foundation. If rigid foam insulation is in place, the poly can extend several inches up onto the foam board, and be sealed to it with tape. But make sure that the joints between foam insulation boards are sealed with tape and/or spray foam to maintain an air/moisture barrier on the walls.
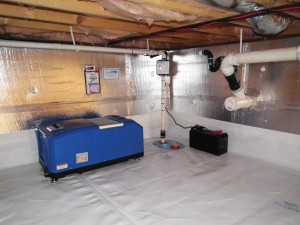
Dry, clean & comfortable. This crawl space was in bad shape before encapsulation and required the full treatment: interior drainage & sump pump, rigid foam wall insulation and a heavy-duty dehumidifier. The end result is a clean, controlled environment that improves comfort, energy efficiency and home value instead of negatively impacting these features.
Extra features are sometimes necessary
In cold climates, insulating the crawl space floor with rigid foam insulation is an extra feature to consider. It’s not as important as wall insulation but it will further reduce wintertime heat loss.
We’ve already covered moisture issues that might require installing drainage and a sump pump in the crawl space. If prolonged wetness in the crawl space has made wood damp & moldy, you’ll need to run a dehumidifier to dry out the space. Get an ENERGY STAR® unit that will automatically dump condensate into your crawl space sump pump or pump it outside. If the encapsulation process has been done correctly, it won’t be necessary to run this appliance forever –just until you’ve dried out the space to under 60% RH to create a mold-hostile environment.
 vs Closed (Encapsulated)")


I have mold in my basement
i have insulated the walls and rimjoists with 2 in ridgidfoam put heavt plasic down on the dirt floor. i amstill having cold flloors what else can i do
@Greg spray foam between your floor joists.
Hello, I have a 5′ high crawlspace w a dirt floor and a newer cement block foundation. The house was moved there, and the foundation built under it. They should have put two more block layers on and it would have been high enough, but sadly they did not. I want a good mixture barrier,and I do have some rigid thick foam on the walls. Crawlspace gets very wet because of rain, even though I have gutters and downspouts on the whole house except the very back side. I am getting gutters installed there to help. I want to water seal my dirt floor and part way up the walls. My house is well built, solid from the 40’s. Windows are in place in the upper part of the foundation for air ventilation. The house is approximately 40 x 26. I have some mold on the walls when we moved the bed!! Can you help me make a plan to waterproof my house?? Thank you!
Just looking to get my mobile home energy efficient a little bit more and need to do the underneath of the trailer
Pretty! This has been a really wonderful post. Thanks for providing these details. Zitella Parry Dumah
These are the most recent and hottest charts we
have created on the perfect games on provide across the world at present as these games have offered essentially the most
copies of all the games launched this year. There are also many sources obtainable to coach yourself additional on the
topic of online harassment. There are various achievements and goals players can work in direction of to generate more factors/coins.
Together with building your participant mat engine using upgrades and
constructions, there can also be The Factory.
While I used to be never personally fascinated with using Movie Mode, I can recognize that it exists.
Instead of utilizing the same tiled board, the Modular Board replaces the unique with items
that can be rearranged to create a a lot totally different expertise every time you
play. Turn by flip, as you improve your actions, build buildings, and visit The Factory, you
may create quite the machine of transferring parts. Players take actions and broaden their empires turn by turn. If the attacker wins,
they take the territory and all its resources.
Trade – pay a coin to accumulate sources or transfer up the popularity
observe. All staff on these territories produce sources depending
on the territory’s terrain kind.